For Sale:
Parts for: International Time Recording Clocks
Brought to you by:
www.GameRoomRepair.com
Shipping and Handling:
I offer free shipping in the USA on all parts that are flat and can be shipped in a standard letter envelope. Insurance and/or a tracking number is extra. Please ask me for a quote if you want these. Also, contact me for shipping rates if you live outside the USA.
Payment and How to Order:
I don't have an Internet Shopping Cart and I don't take Credit or Debit Cards (sorry). To order, please send me an E-Mail with the parts you want to order, and tell me the payment method you want to use. I will reply with the total amount due and instuctions on how to pay. I accept cash, personal checks (15 day hold), money orders, Western Union, Zelle, and Paypal.
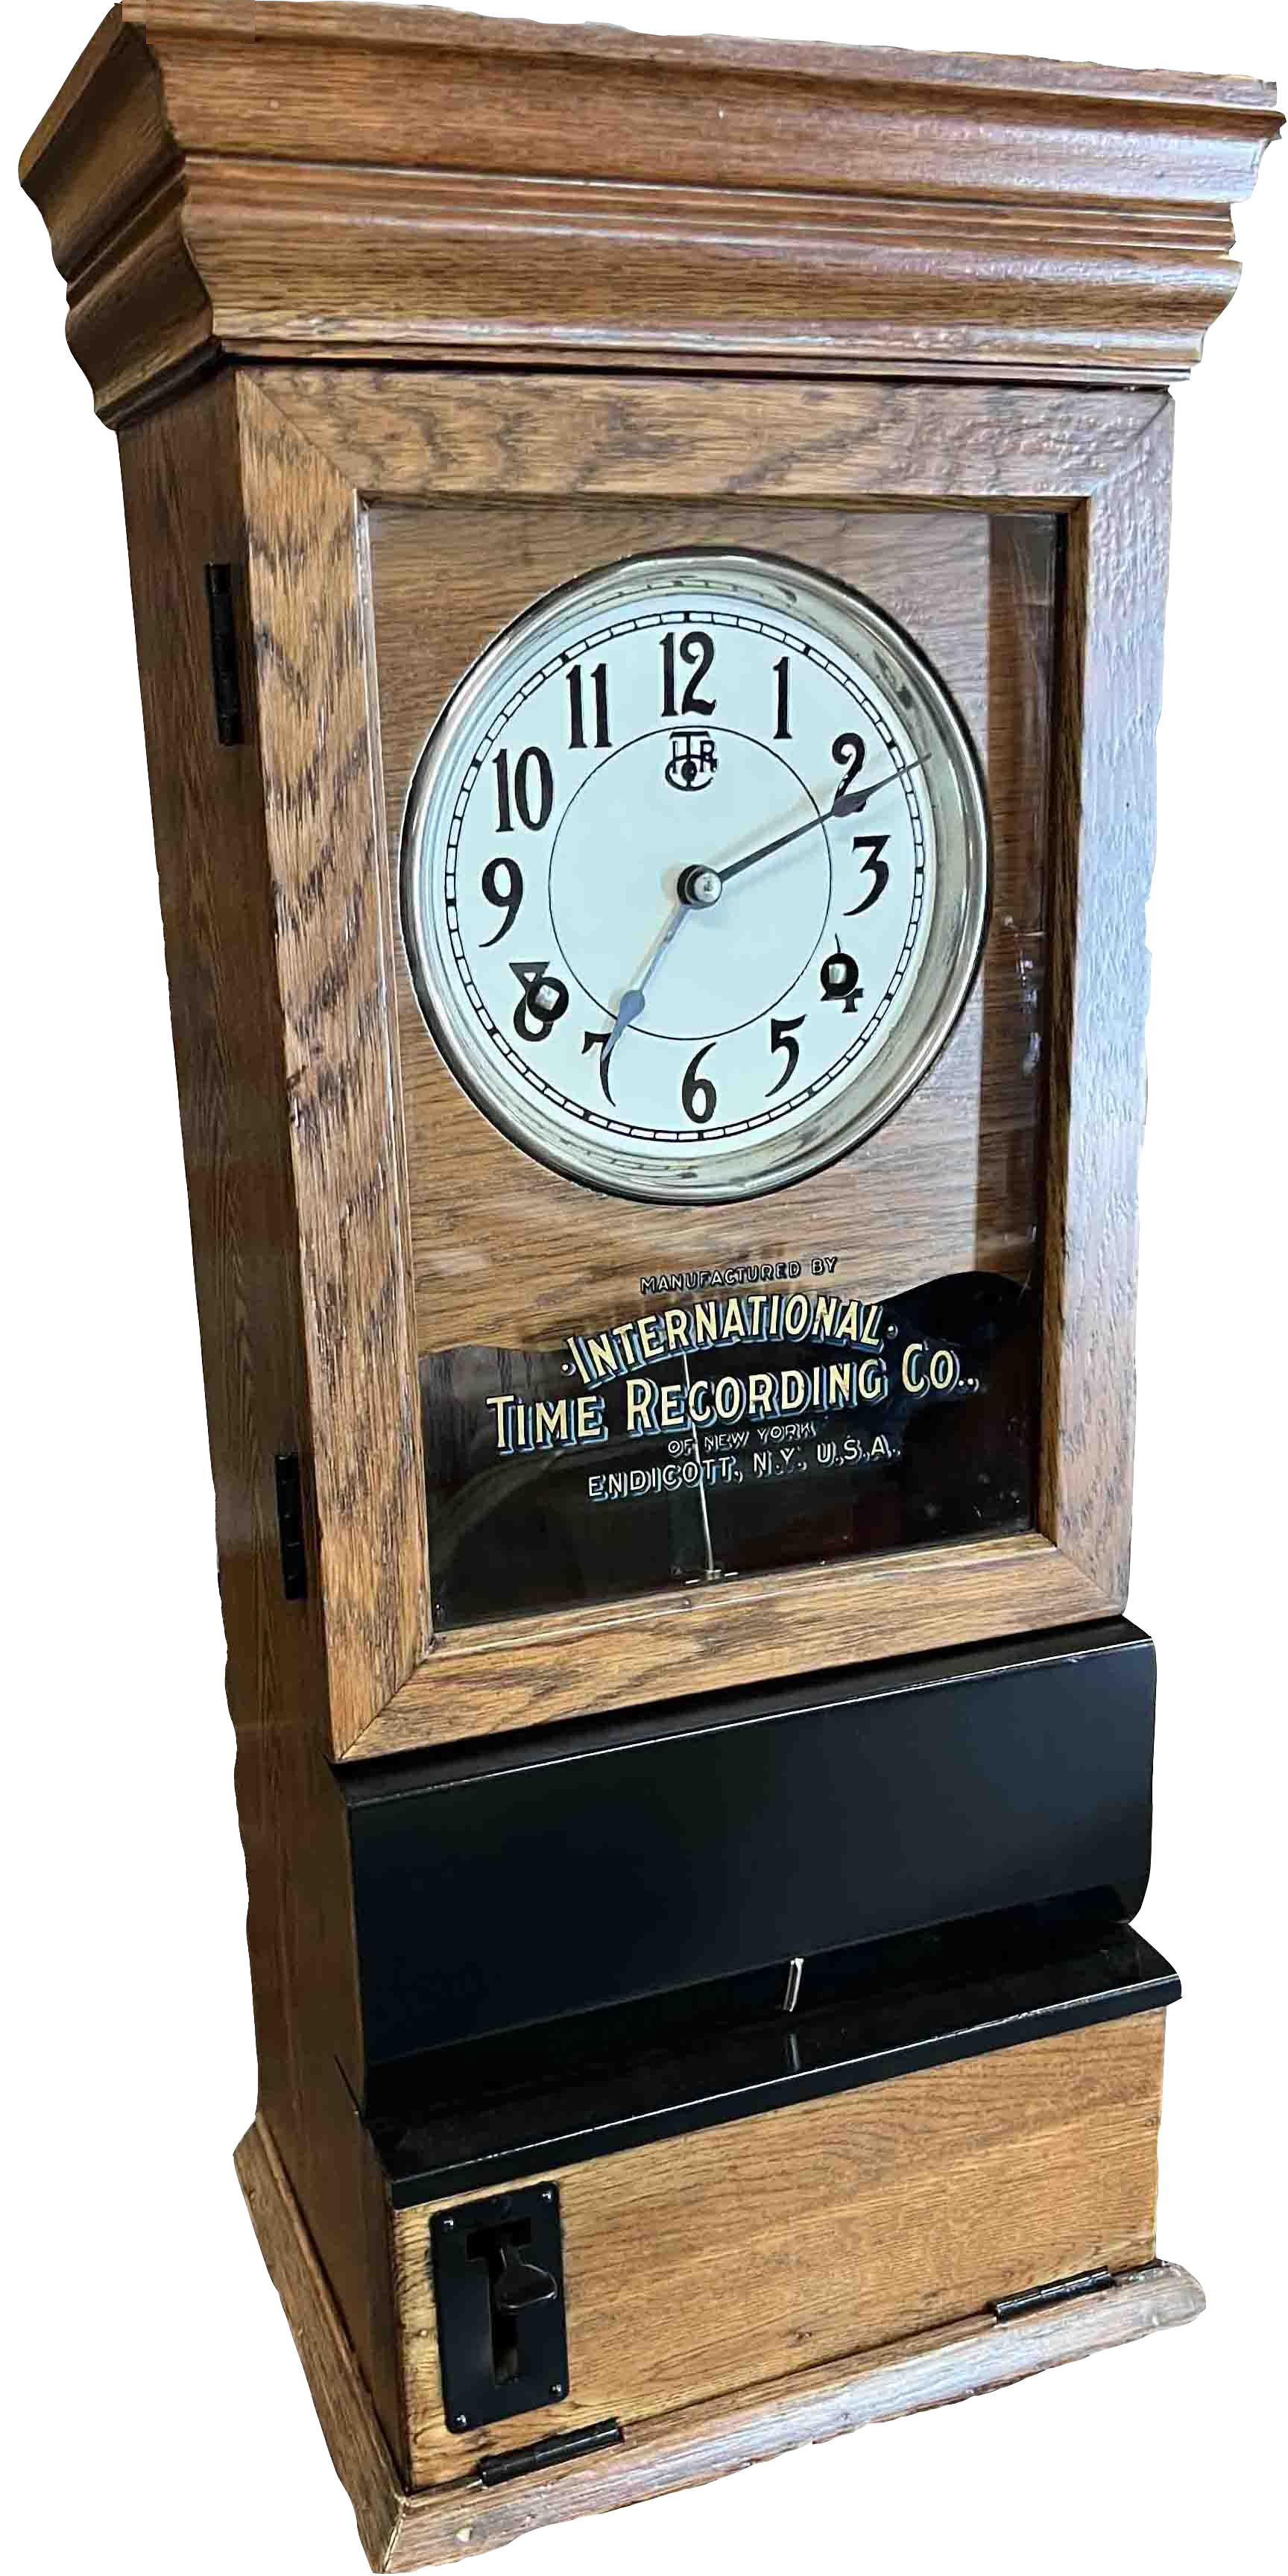
Door Glass Decal
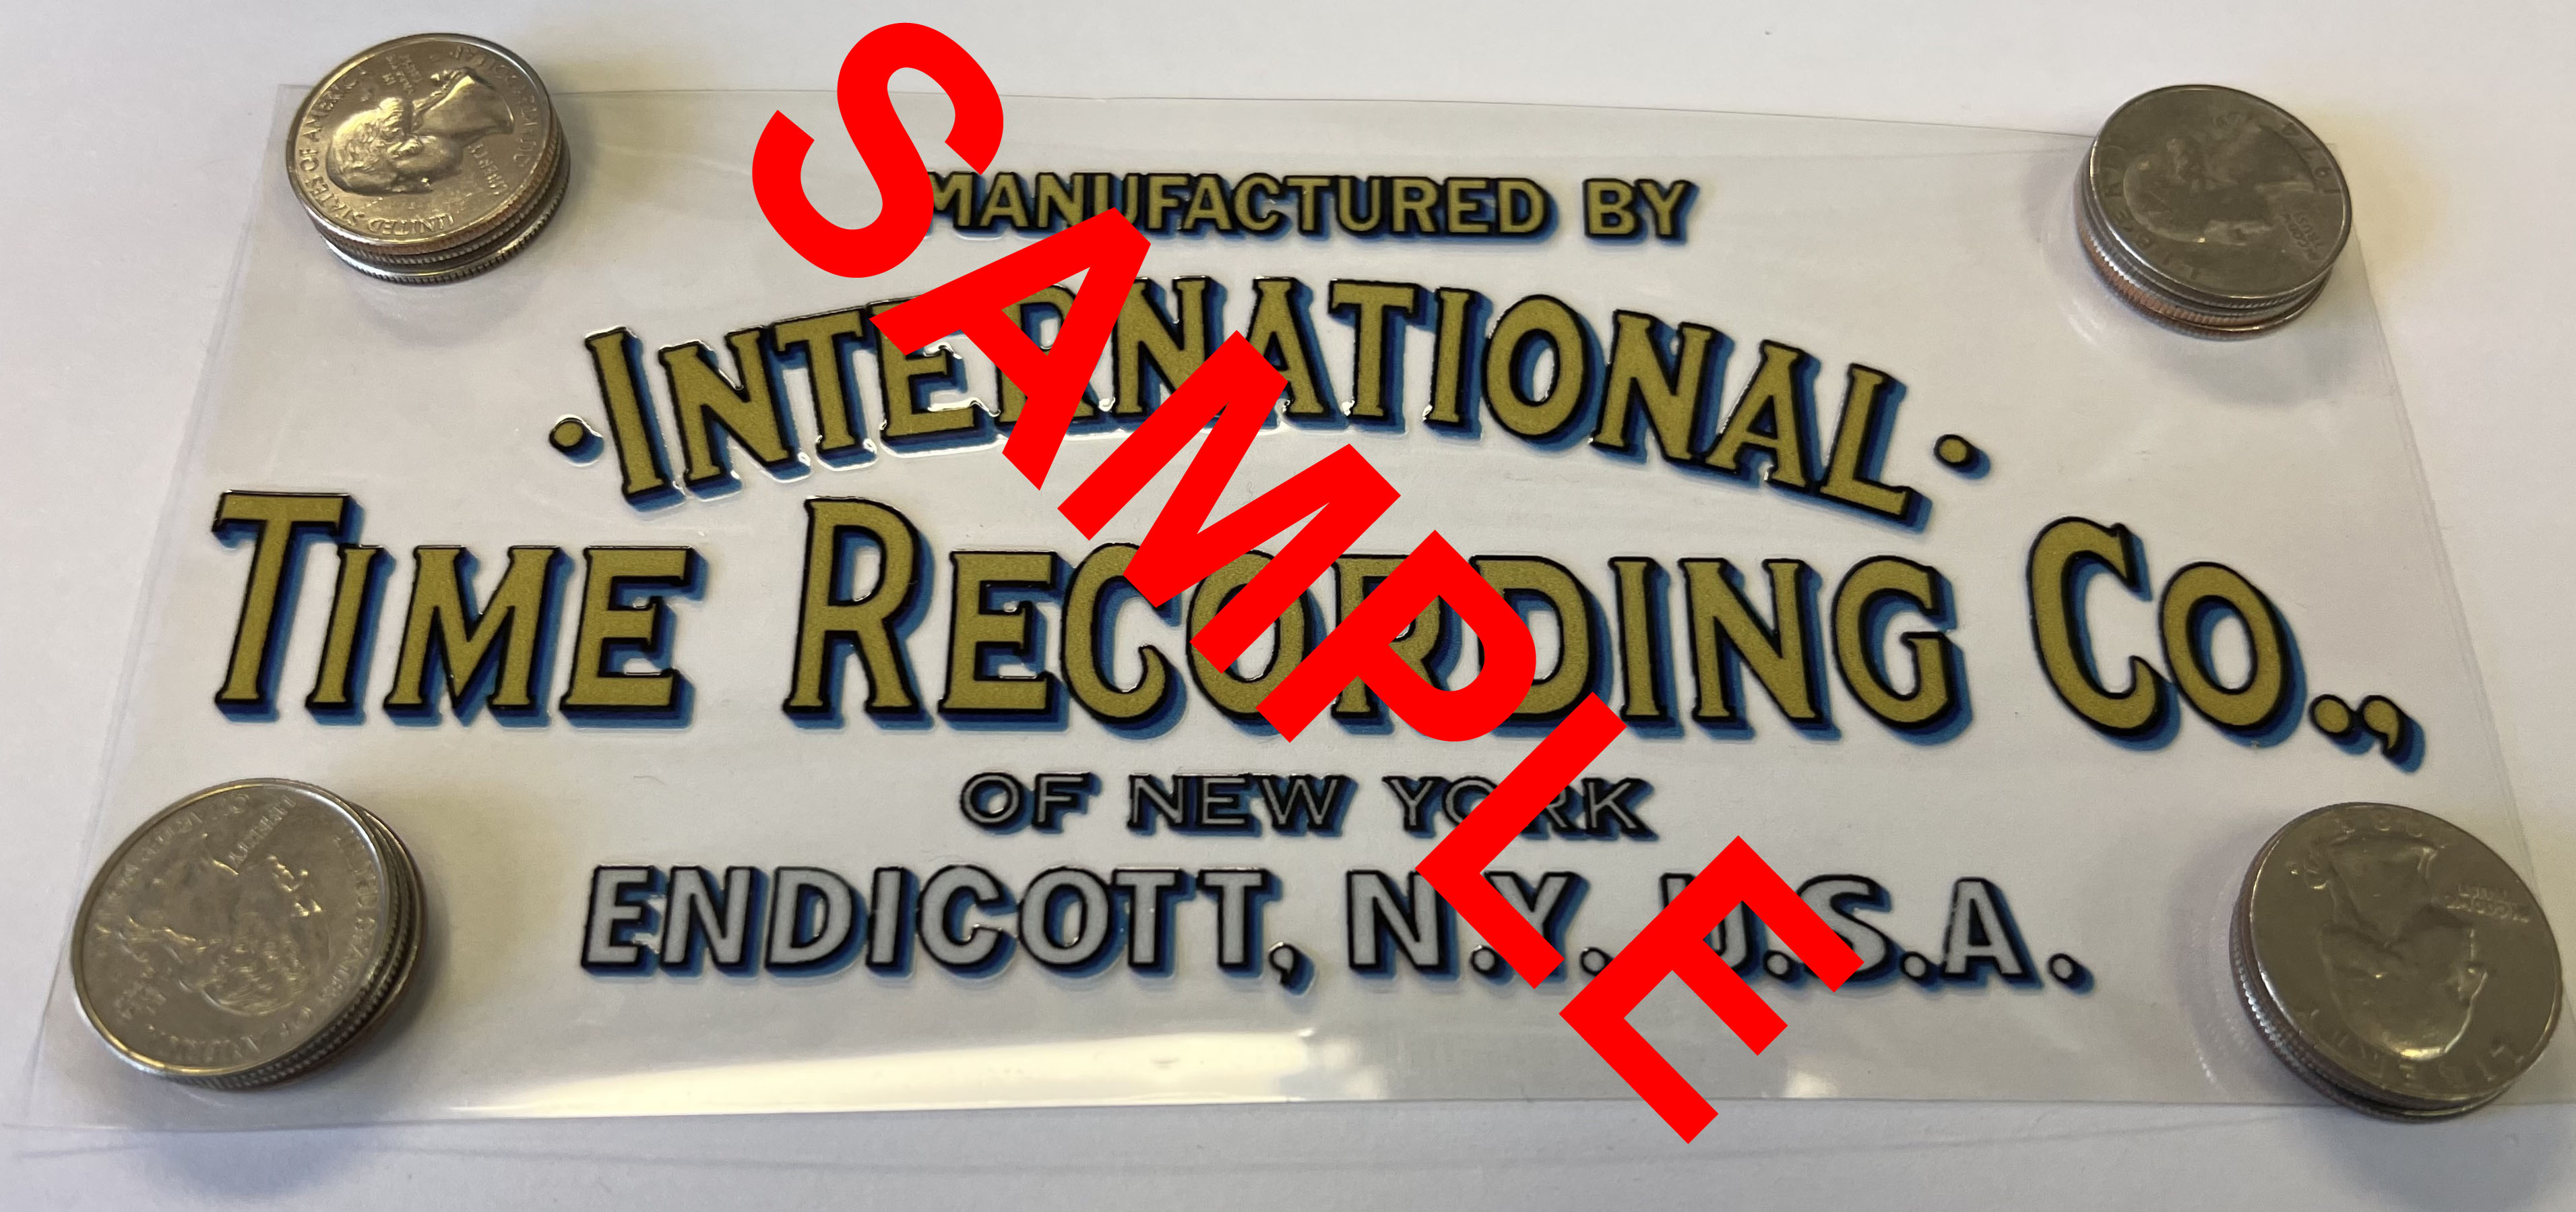
This is my most popular selling item! This decal really makes the cabinet "Pop" with color and style. This decal was used on most model ITR clocks from the late 1890s to around 1930. The original decal was a "Water Slide" decal that required you to soak the decal in warm water, then slide the decal off of its paper backing and onto the glass. The decal was applied to the inside of the glass and viewed from the front side. But water slide decals take a bit of skill to align and then carefully slide from its paper backing onto the glass without tearing, creasing, or damaging the decal. Especially one this size!
Modern technology and printing techniques have replaced the water slide method with a "dry rub-on" printing process which is much easier to apply, but just as colorful and durable as the original, once it's on the glass.
My "Dry Transfer" decals look exactly like the original. They feature a golden-brown color for the main ITR letters, and a silver color for the city and state of manufacture. All letters have a thin black border around them and are offset by a two-color shadow of dark blue and then light blue, as shown in the adjacent picture.
The decal comes with full instructions on how to apply it to your glass. Simply peel off the first layer of protective film, align the decal at the proper location (described in the instructions), press the decal onto the glass and rub it with the edge of a credit card or similar semi-stiff blade, and then remove the second layer of protective film. Once applied, it is difficult to scratch off. Removal requires a razor blade.
CAUTION: There are other decals on the market. I used to sell these decals so I know their quality. I had many complaints because the protective film was hard to remove and often tore the letters. These previous decals also varried in color and opaque-ness from lot to lot. Some would be slightly transparent and did not look right when applied to the glass. My competitor's decals cost less than mine, but I guarantee that mine are better in color quality and much easier to apply!
I Sell These Decals in Two Styles: The graphics, lettering, and colors on both decals look exactly the same. The only difference between them, is that one style is applied to the rear (inside) of the glass, as original. The other style is applied to the front (outside) of the glass. The only reason I offer both styles of decal is because it takes several extra manufacturing steps to print the decal so that it can be applied to the rear of the glass, as the original water slide decals were made. This causes these decals to cost a bit more compared to the same exact decal, but made to apply to the front of the glass. This difference in cost is reflected in the prices shown below. Again, both decals are extremely durable. If you want to save a few dollars, buy the "Applied Outside" decal. It will not rub-off or get damaged by casual hand rubs or cleaning off finger prints from the glass. To have your clock decal just like original, buy the "Applied Inside" decal.
| Applied Inside the Glass | ||
|---|---|---|
| Qty | Each | Total |
| 1 decal | $58.95 | $58.95 |
| 2 decals | $48.95 | $97.90 |
| 5 decals | $41.95 | $209.75 |
| Applied Outside the Glass | ||
|---|---|---|
| Qty | Each | Total |
| 1 decal | $38.95 | $38.95 |
| 2 decals | $28.95 | $57.90 |
| 5 decals | $19.95 | $99.75 |
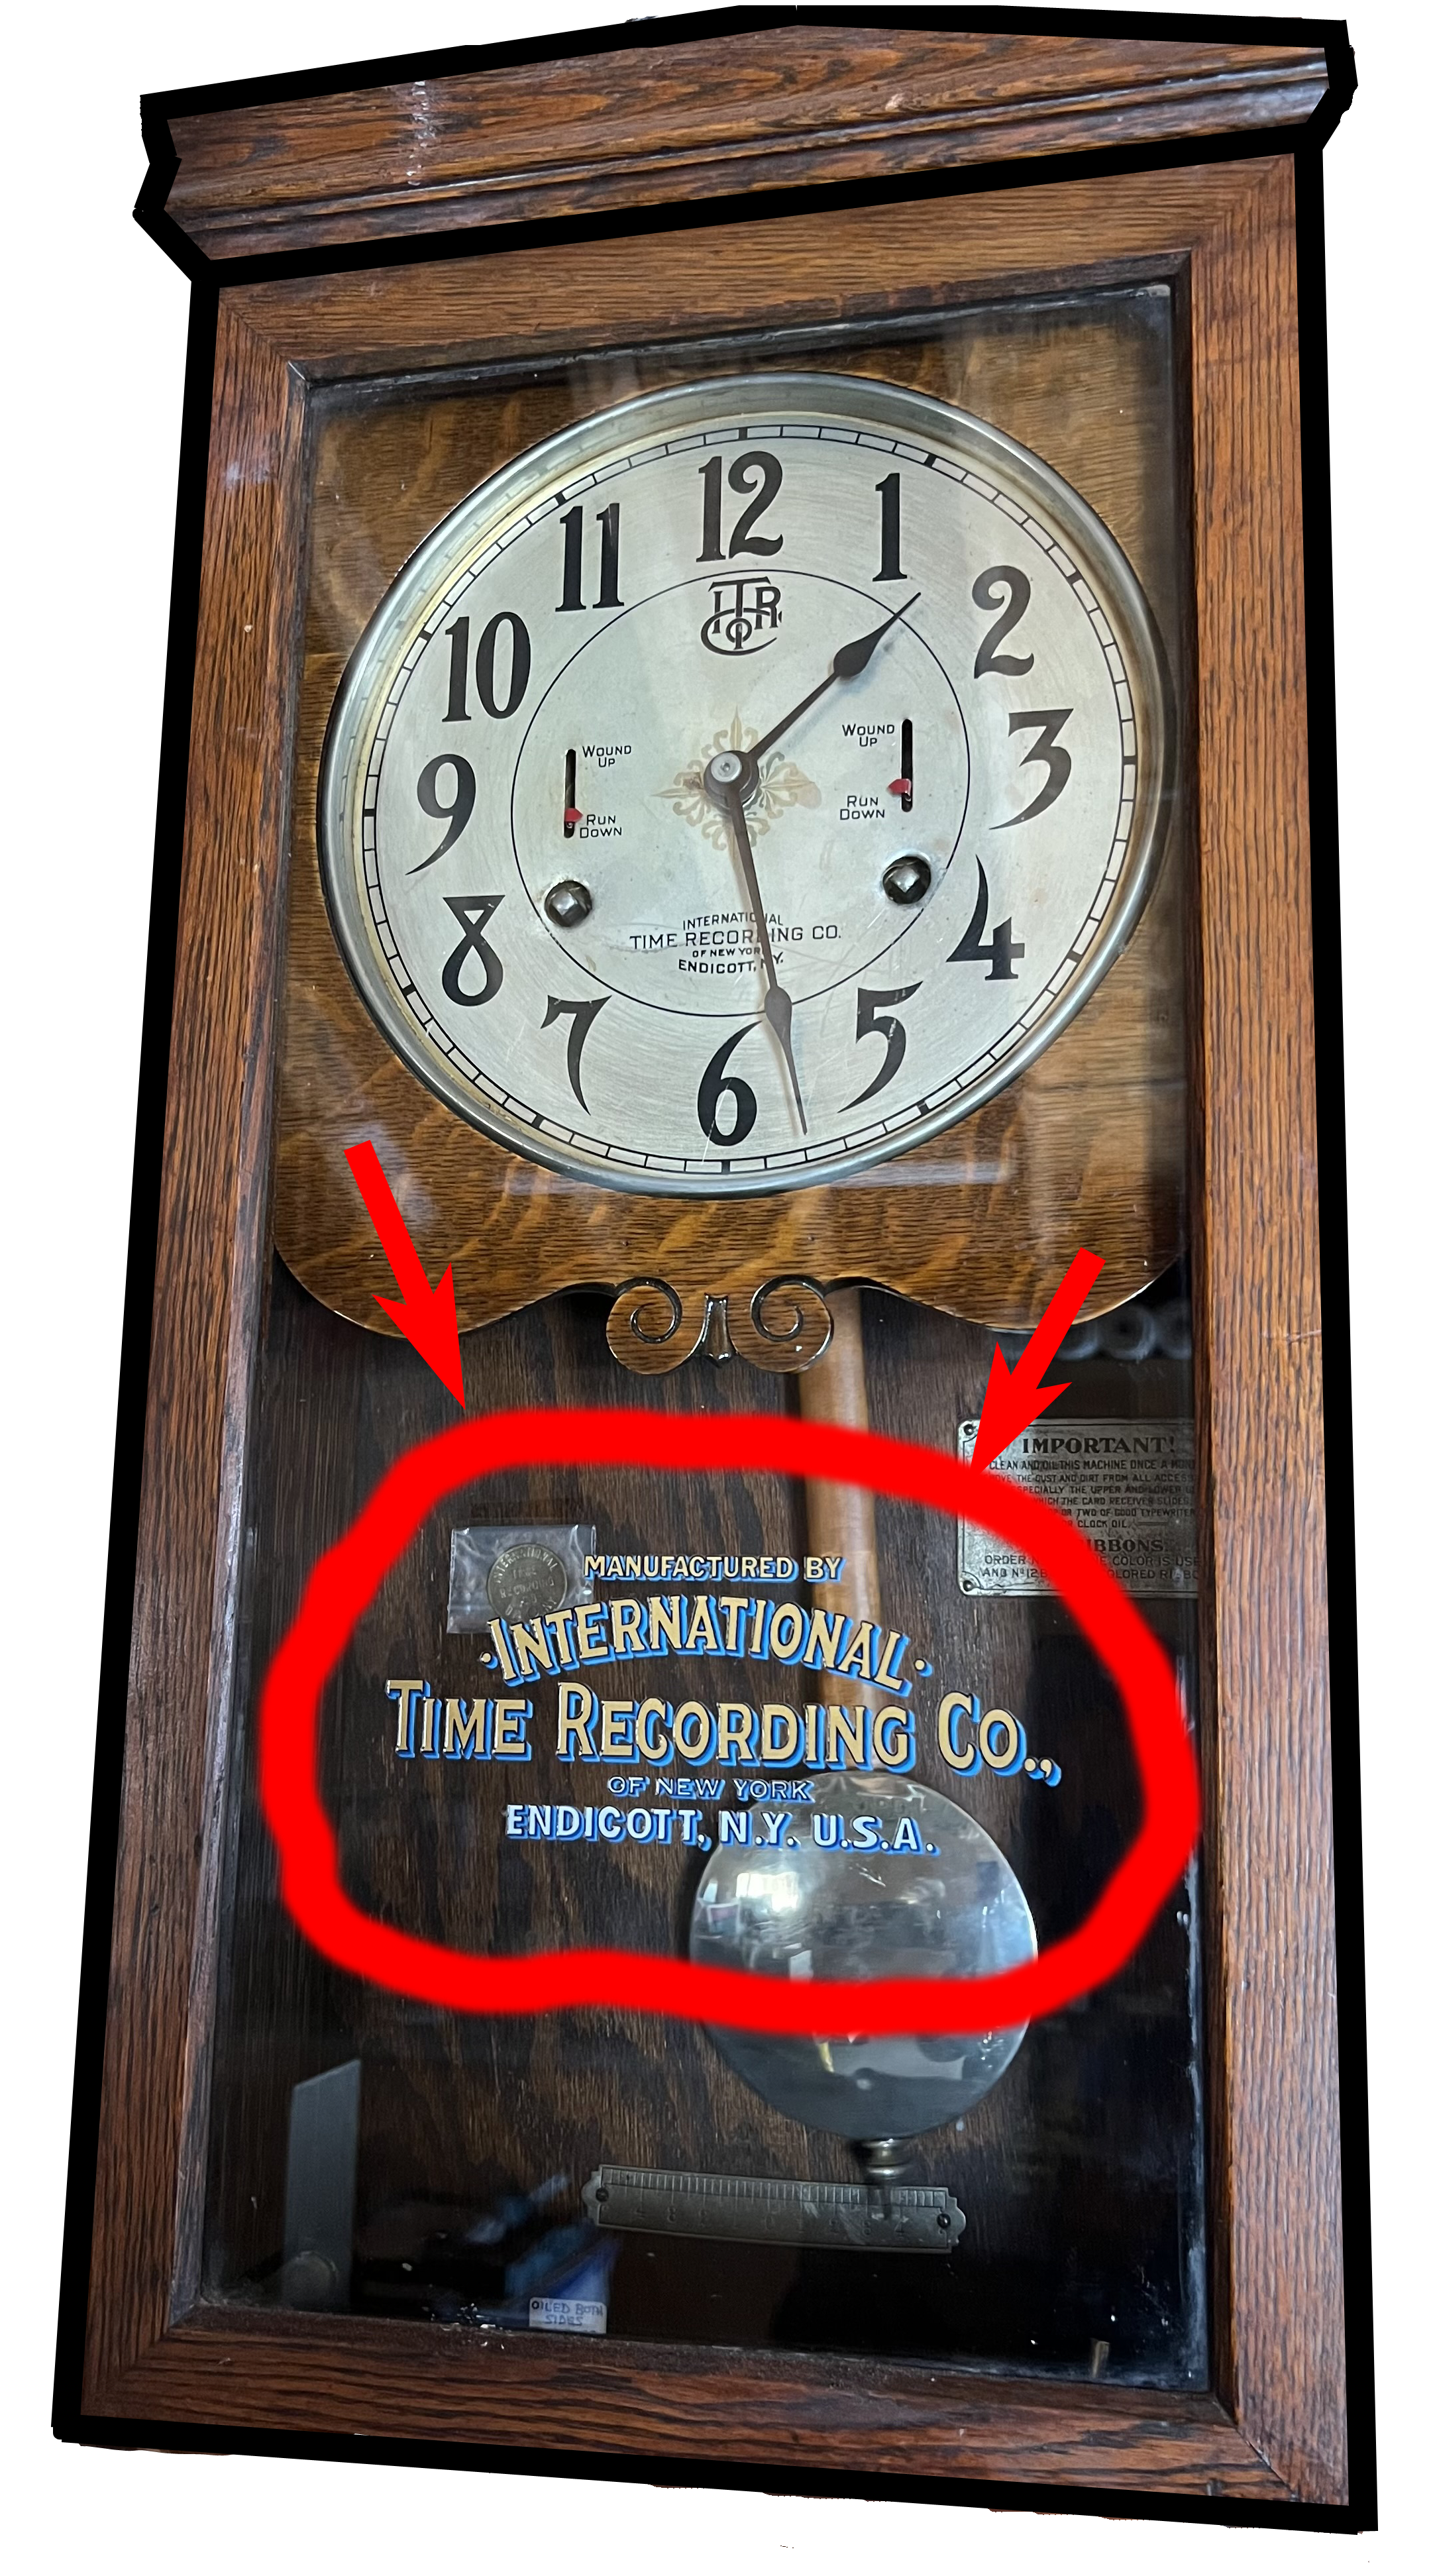
Mechanism Oiling Instruction Plate and Ink Ribbon Part Number Plate
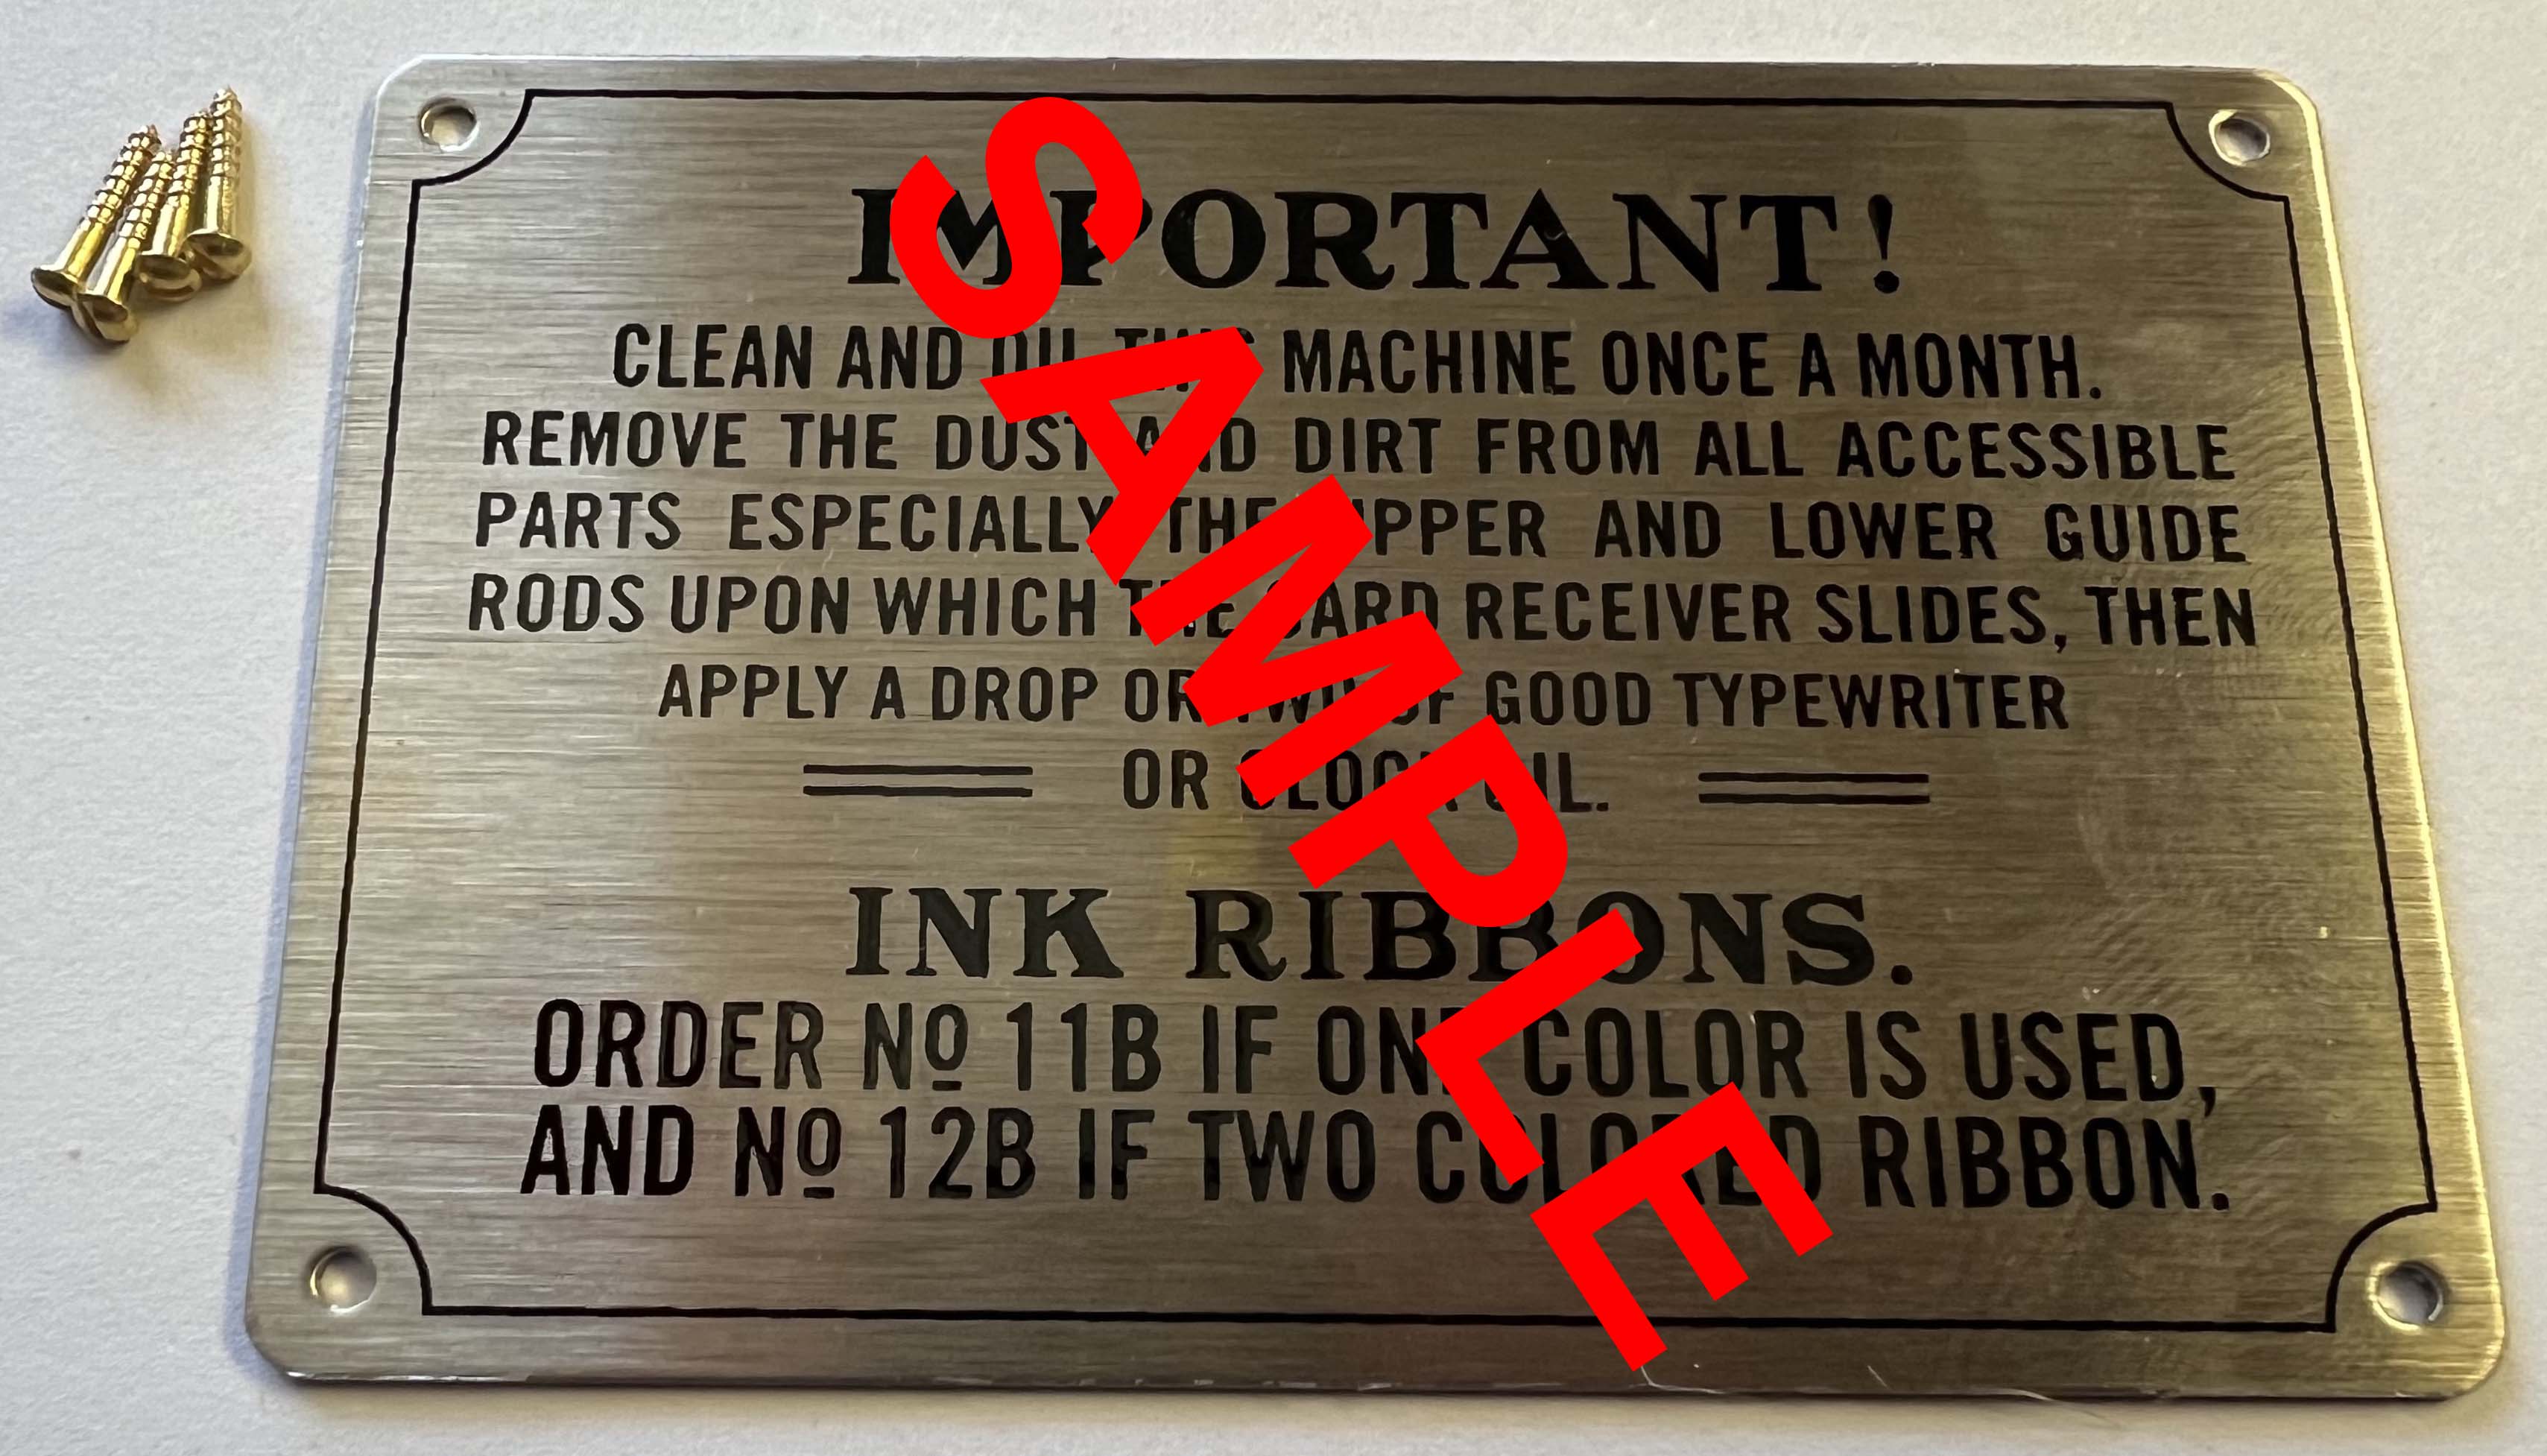
This metal plate was typically found mounted to the rear or side wall in all ITR clocks from the late 1890s to around 1930. The original plate was made of brass and then coated with a silver compound and printed with black letters. The silver eventually tarnished with age, so every one of them have darkend and tarnished. The brass can also corrode and develope a green coating on the plate.
My reproduction plate is stamped from 0.030" stainless steal and printed with black letters that match the original lettering fonts. Then, the front face of the plate is coated with an anti-tarnish finish for long lasting durability. Comes with 4pcs brass round-head slotted wood screws, ready to replace your corroded or missing original plate.
| Instruction Plate | ||
|---|---|---|
| Qty | Each | Total |
| 1 plate | $54.95 | $54.95 |
| 2 plates | $46.95 | $93.90 |
| 5 plates | $34.95 | $174.75 |
| 10 plates | $26.95 | $269.00 |
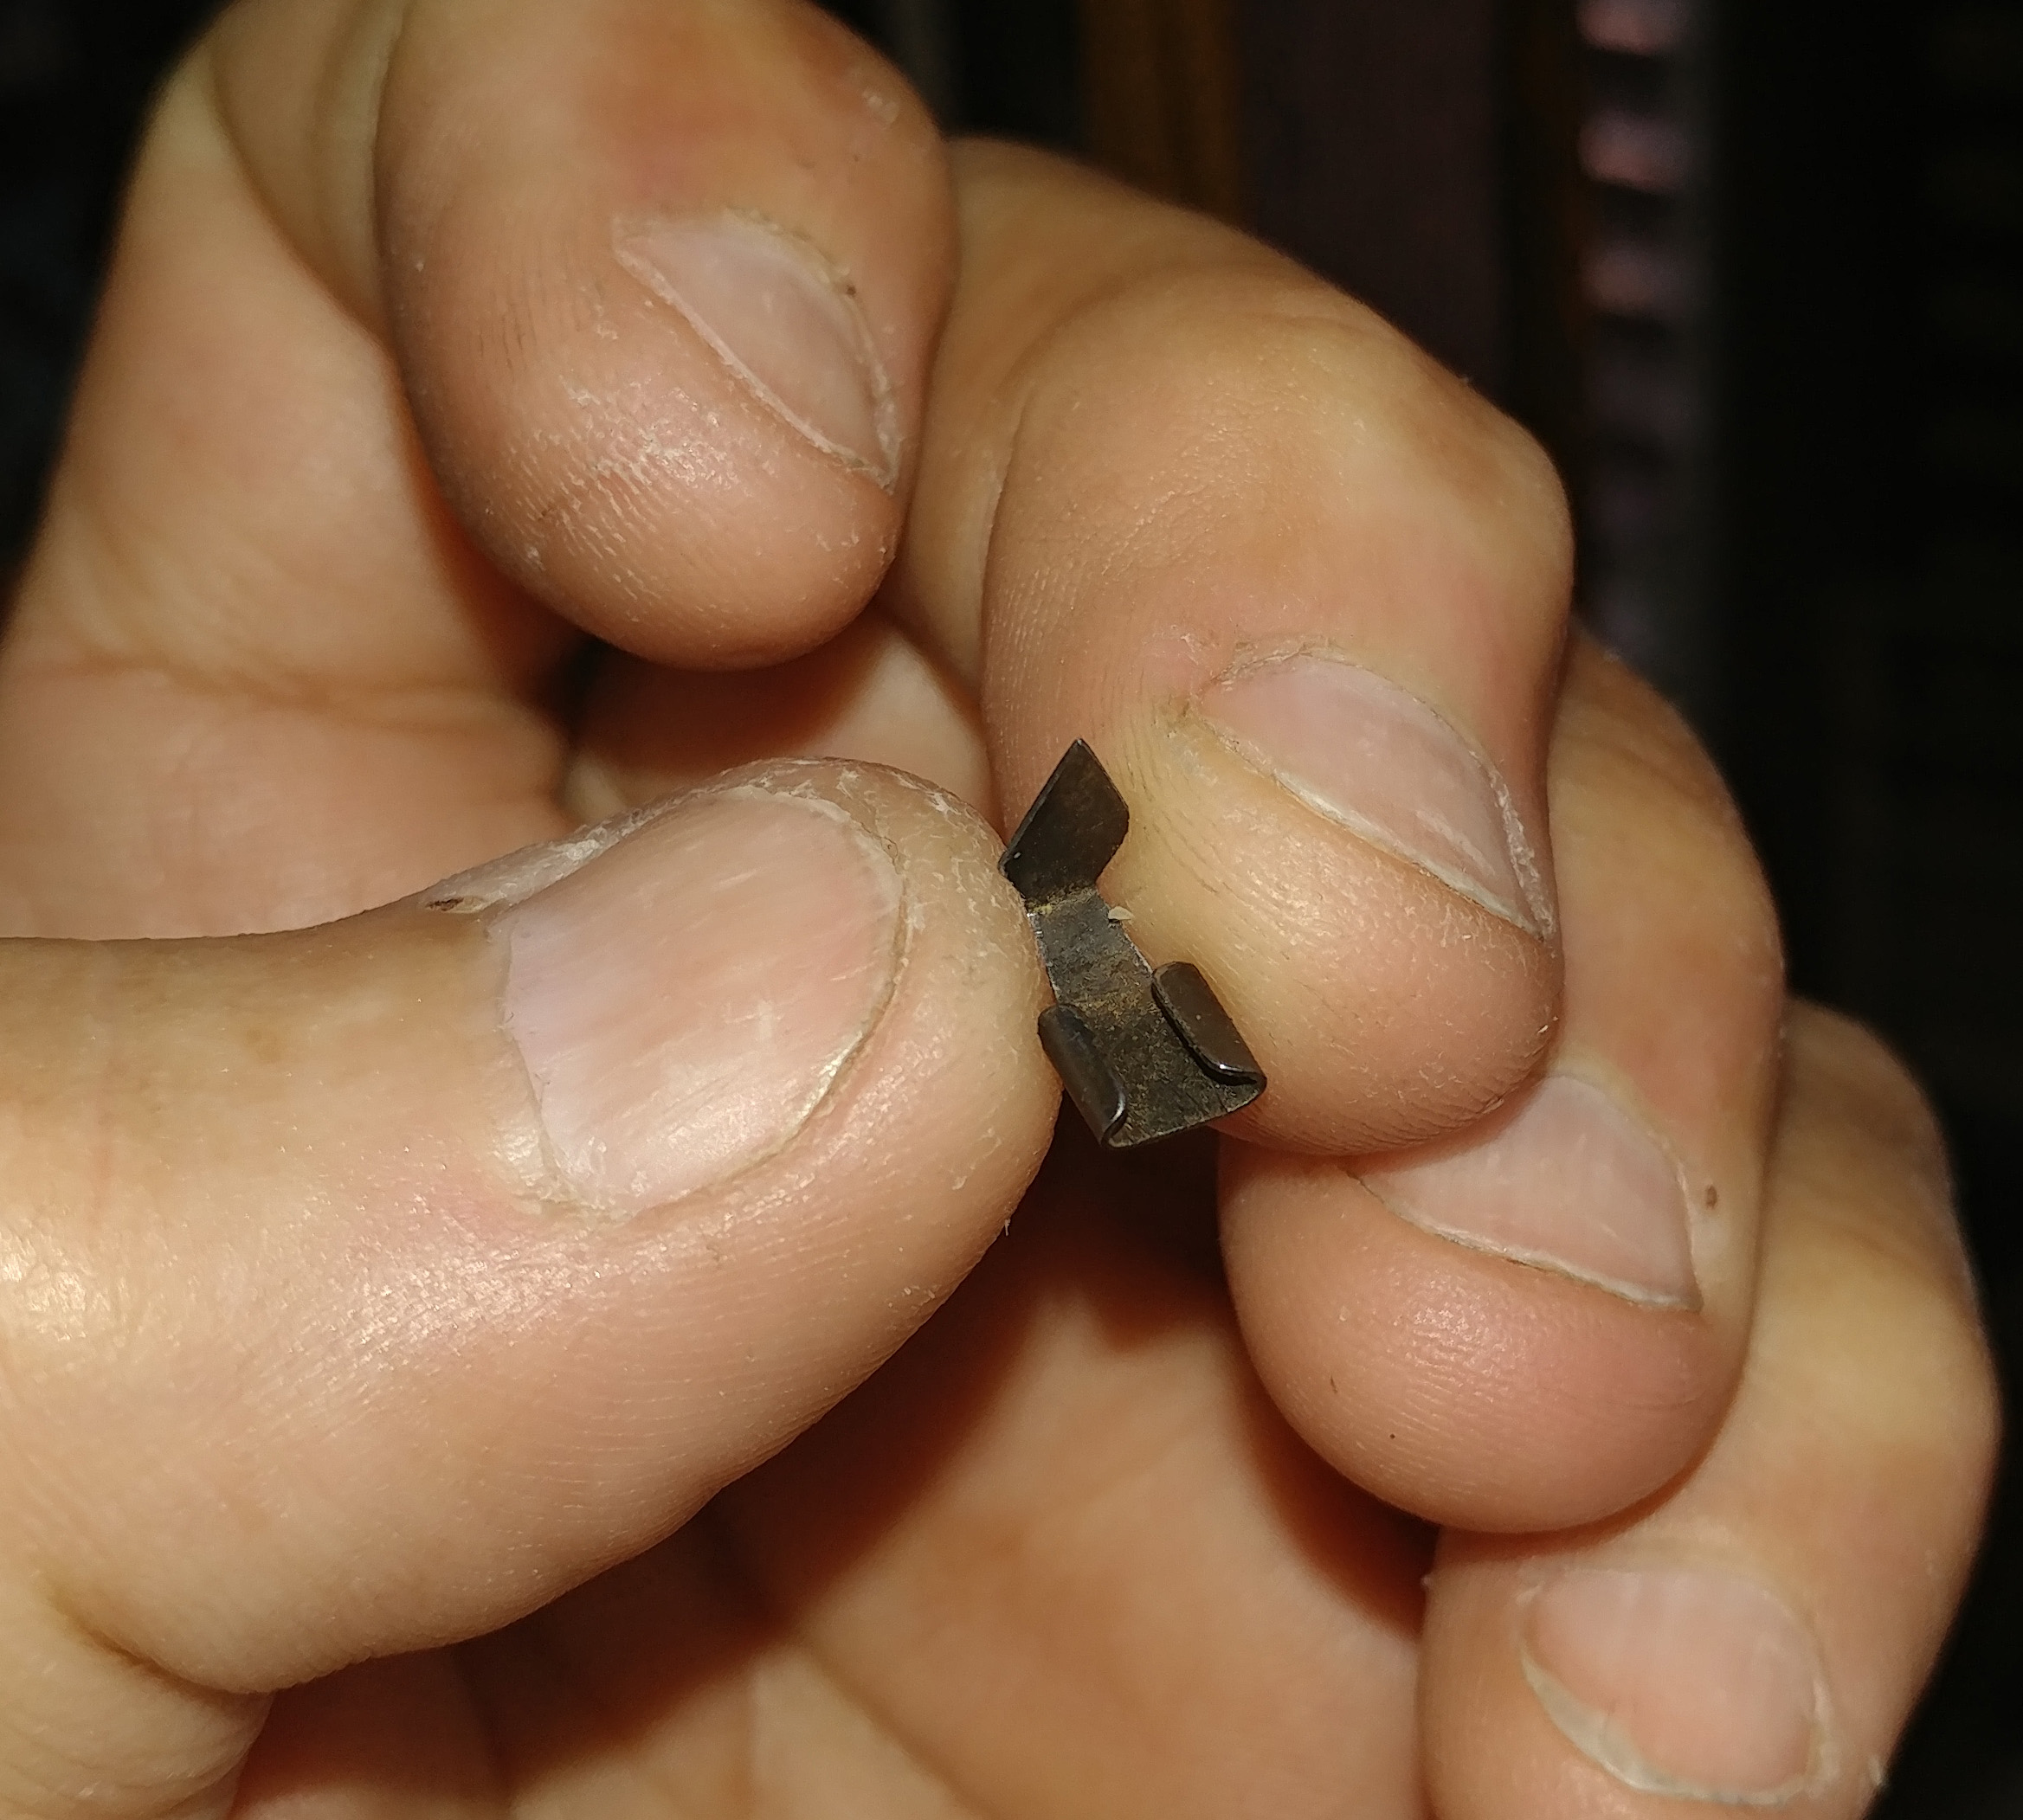
Clock Wind Indicator Pointers
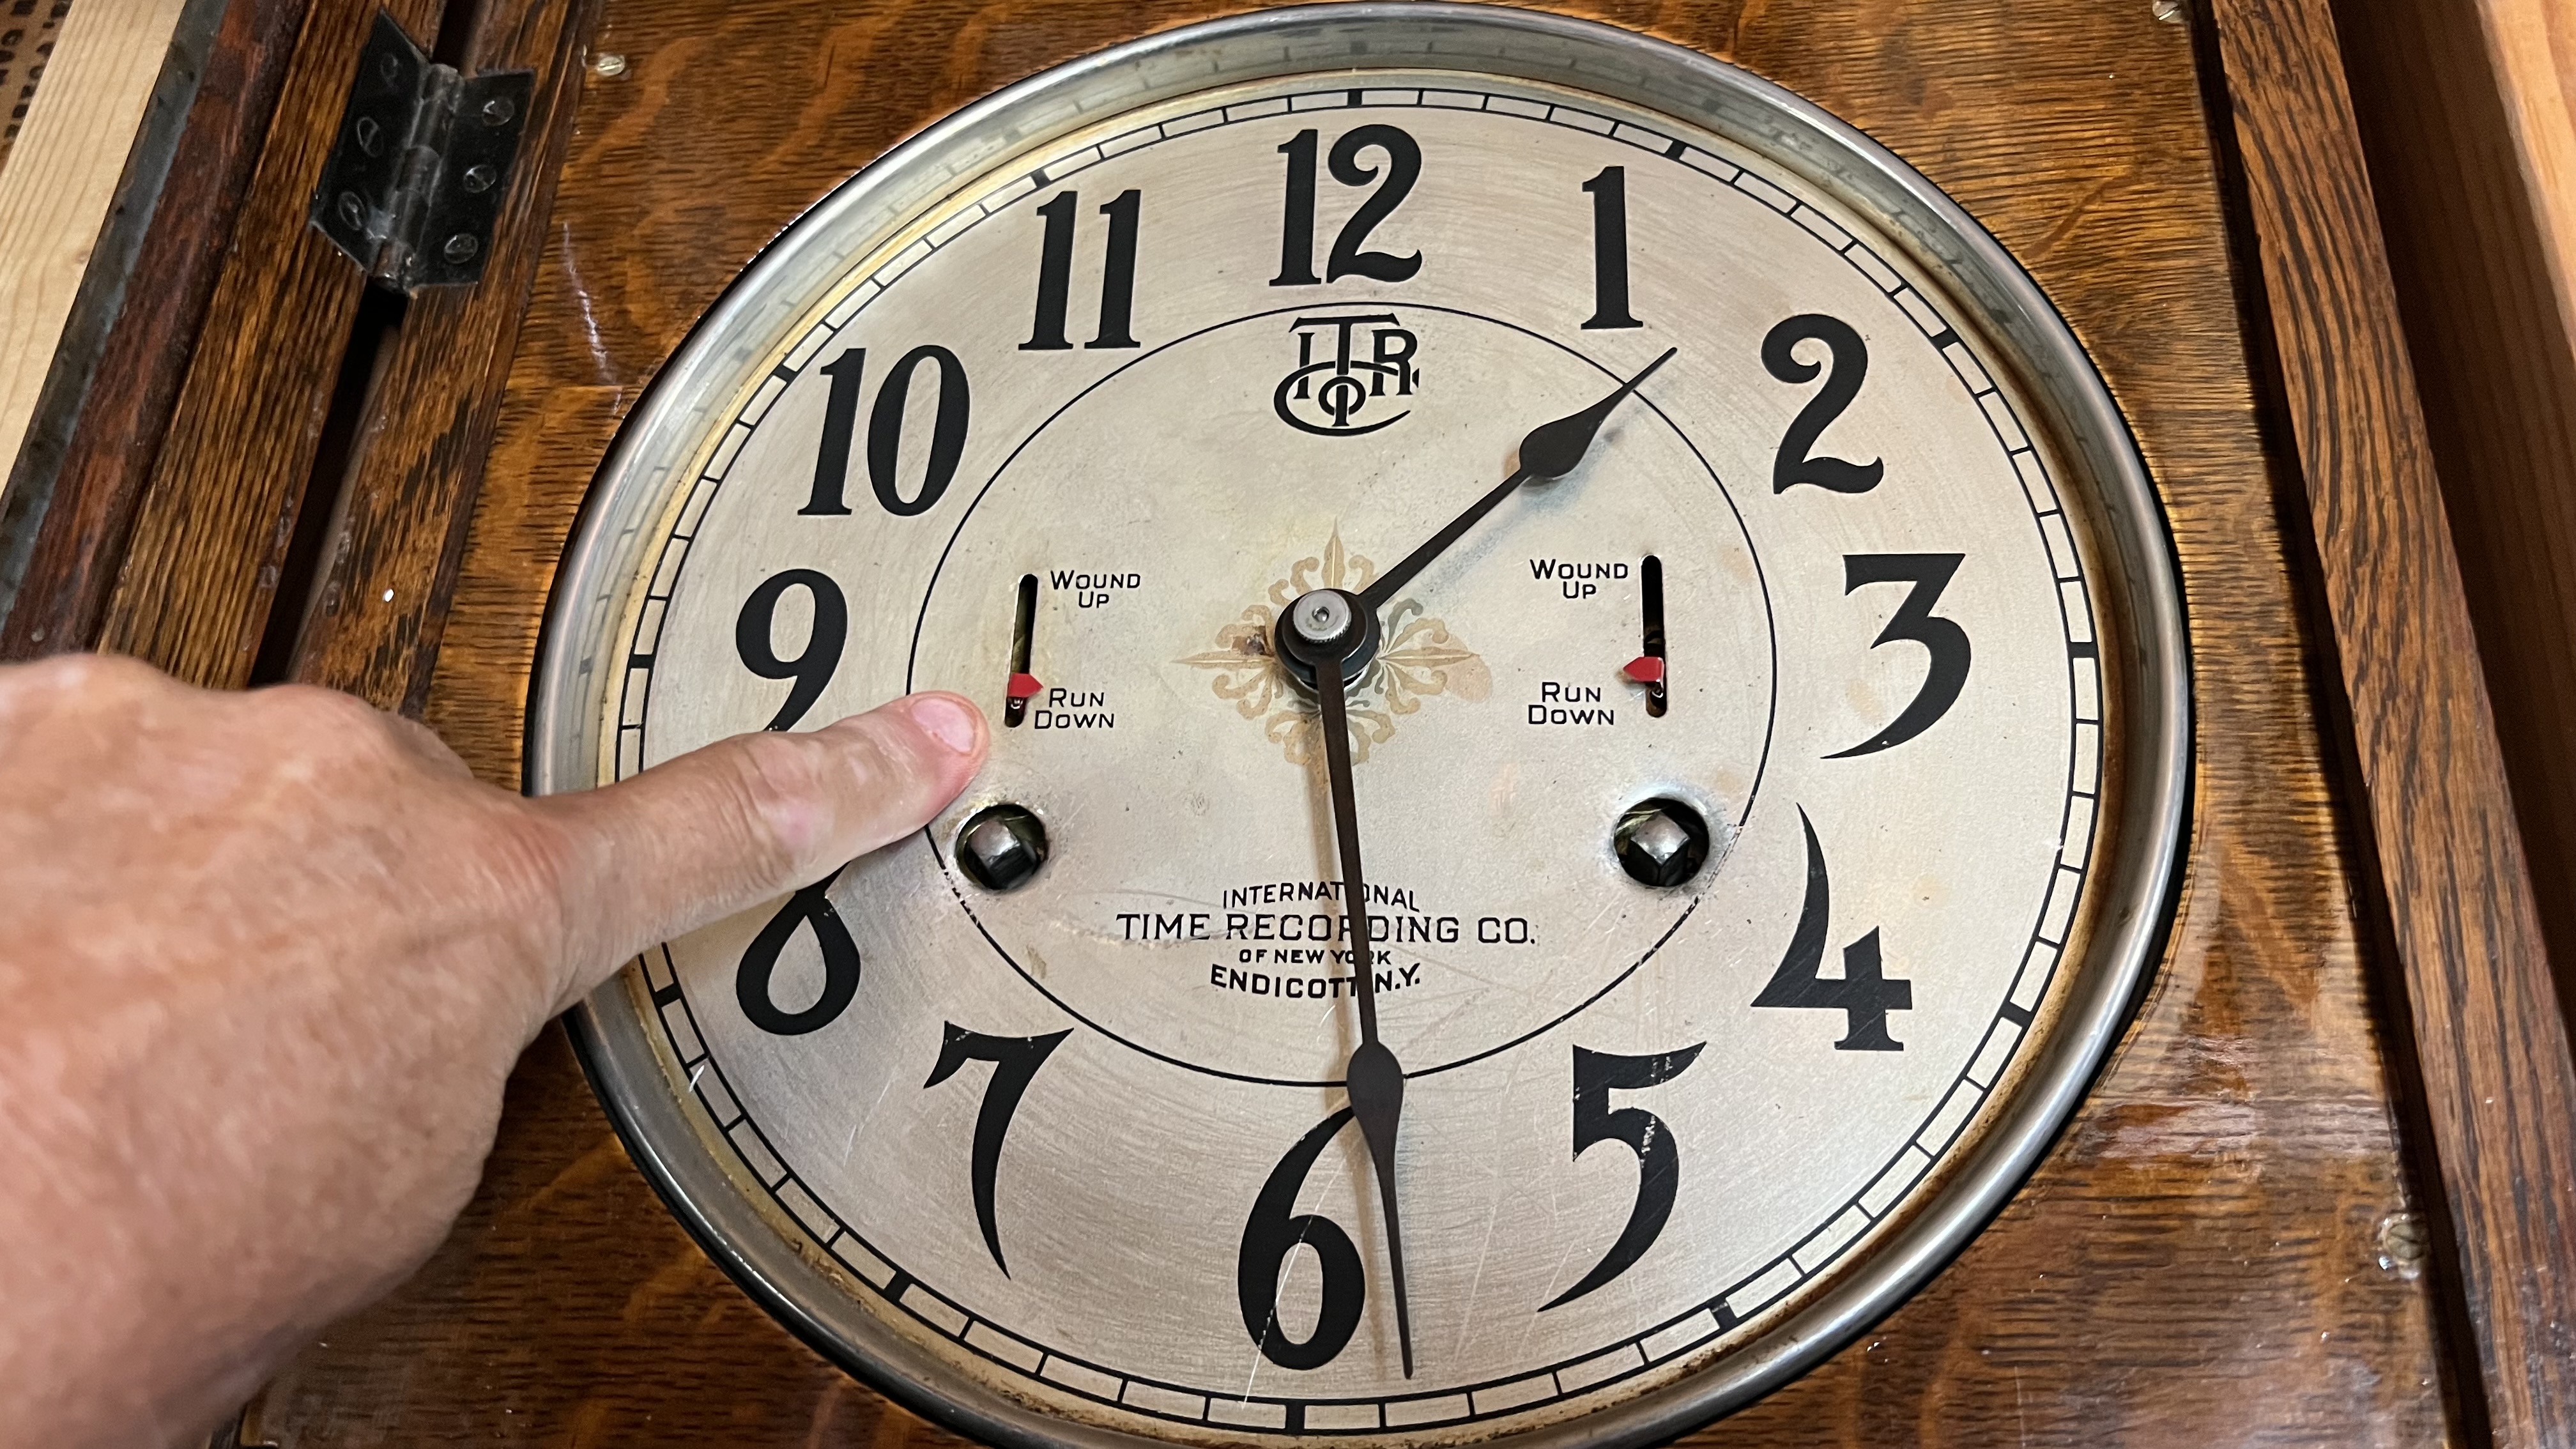
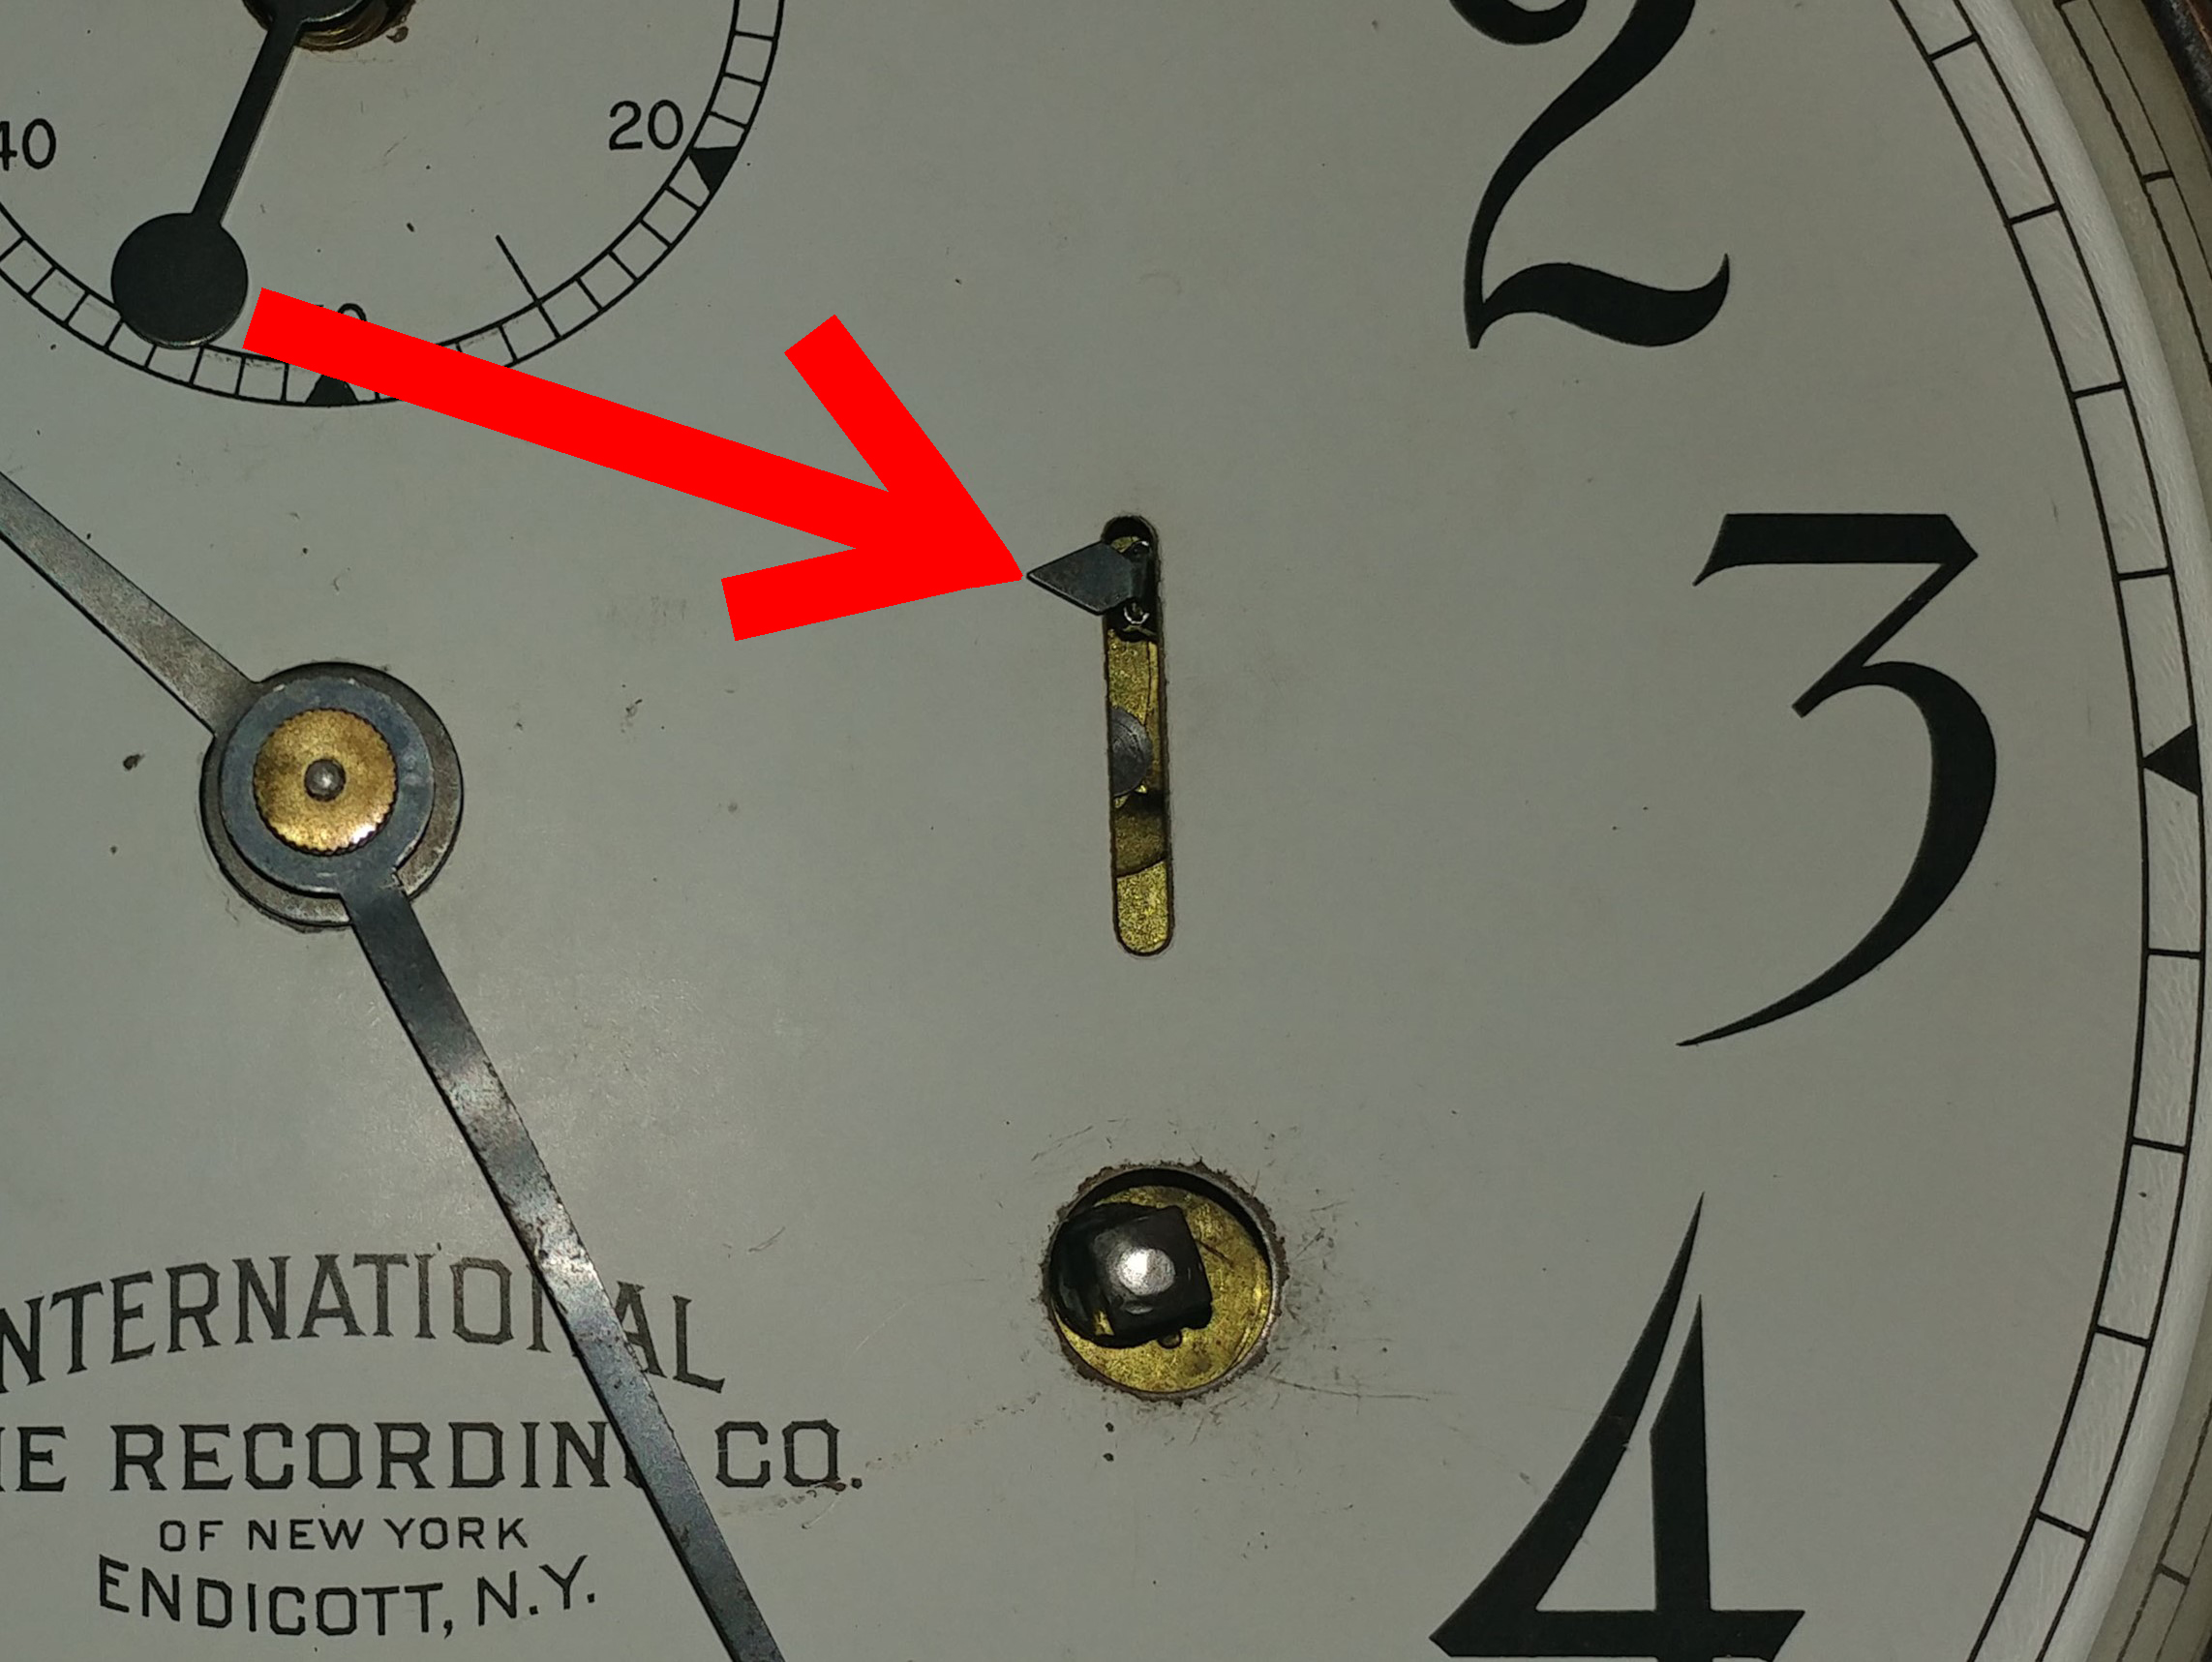
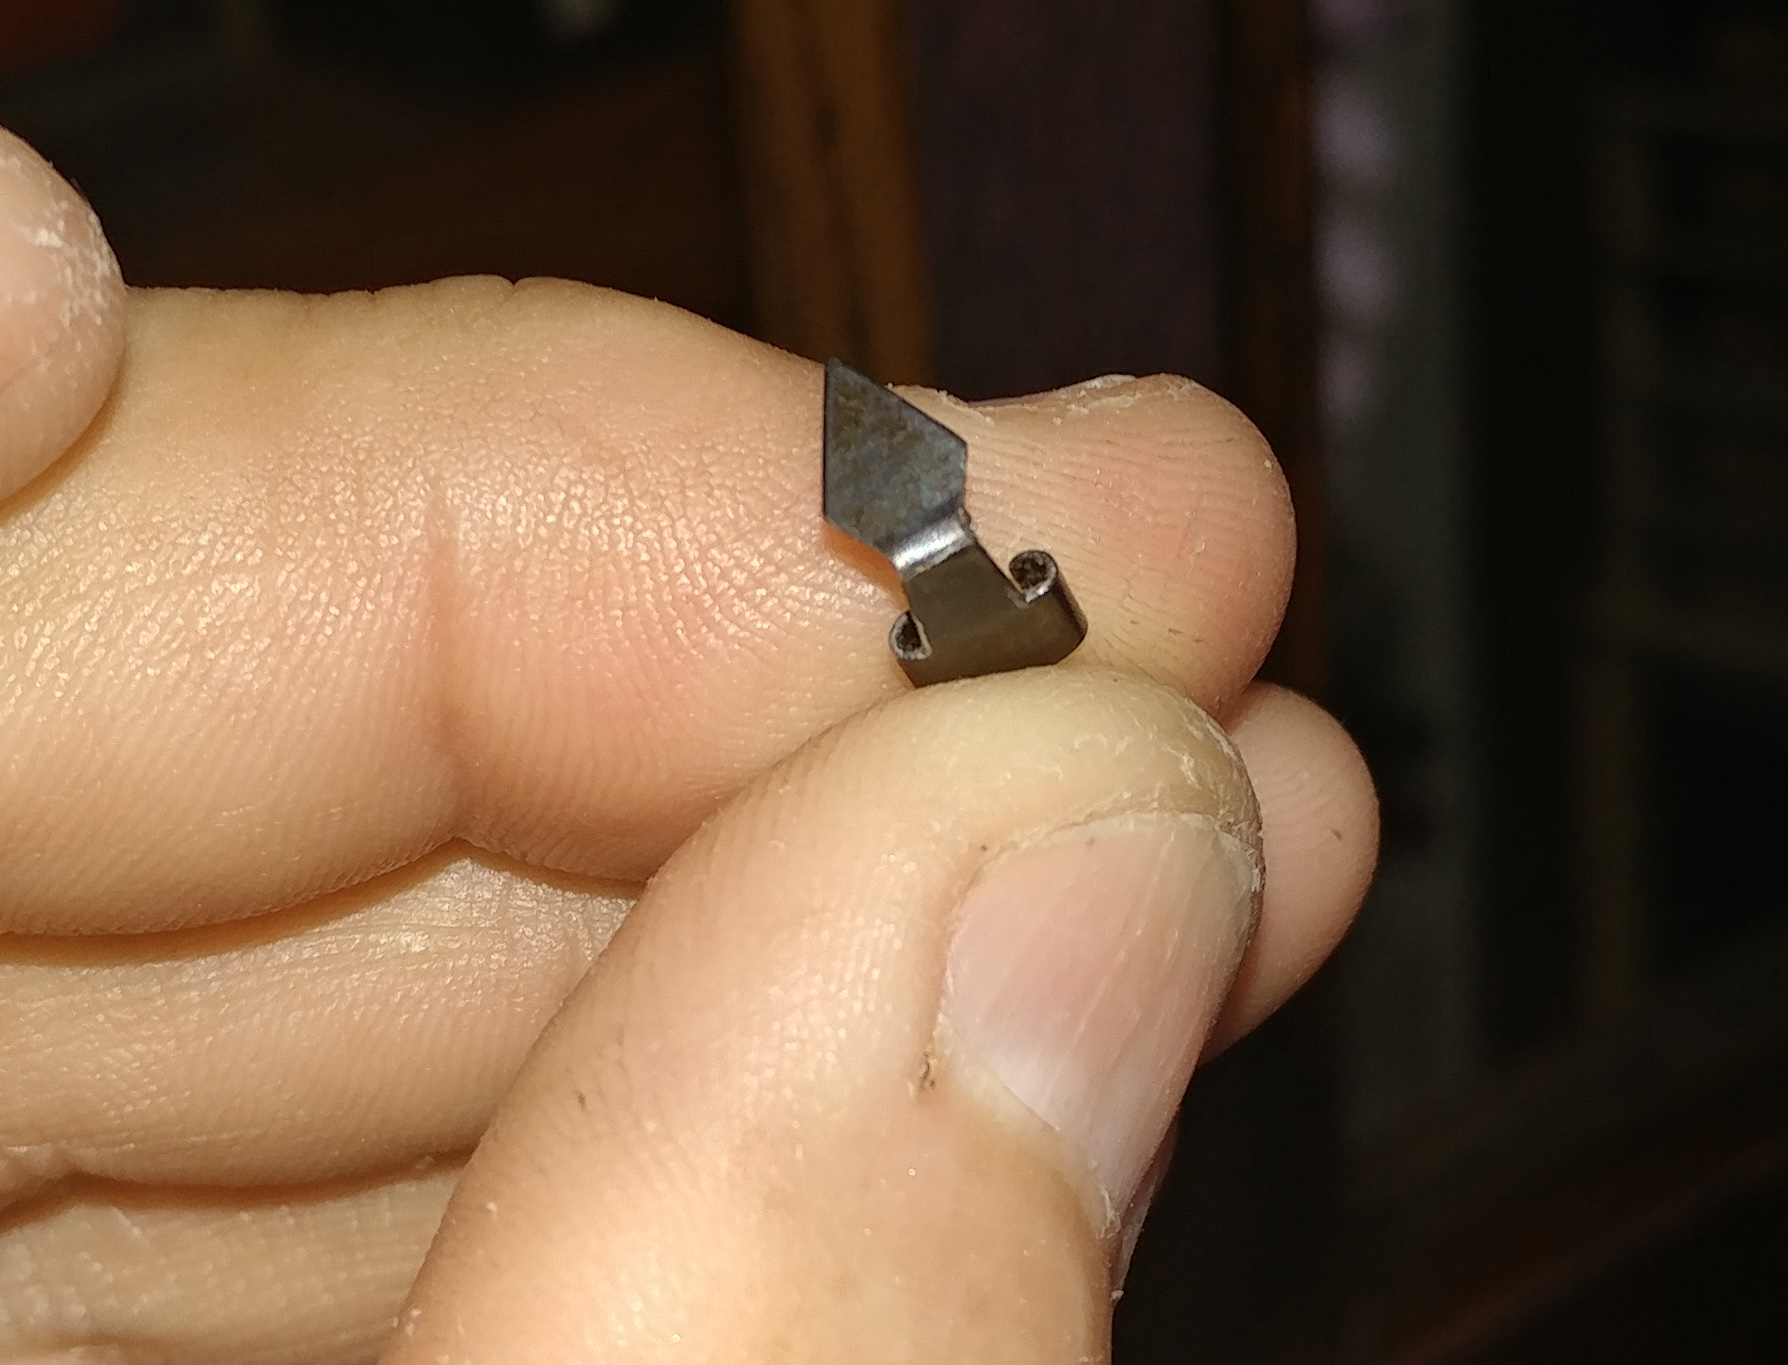
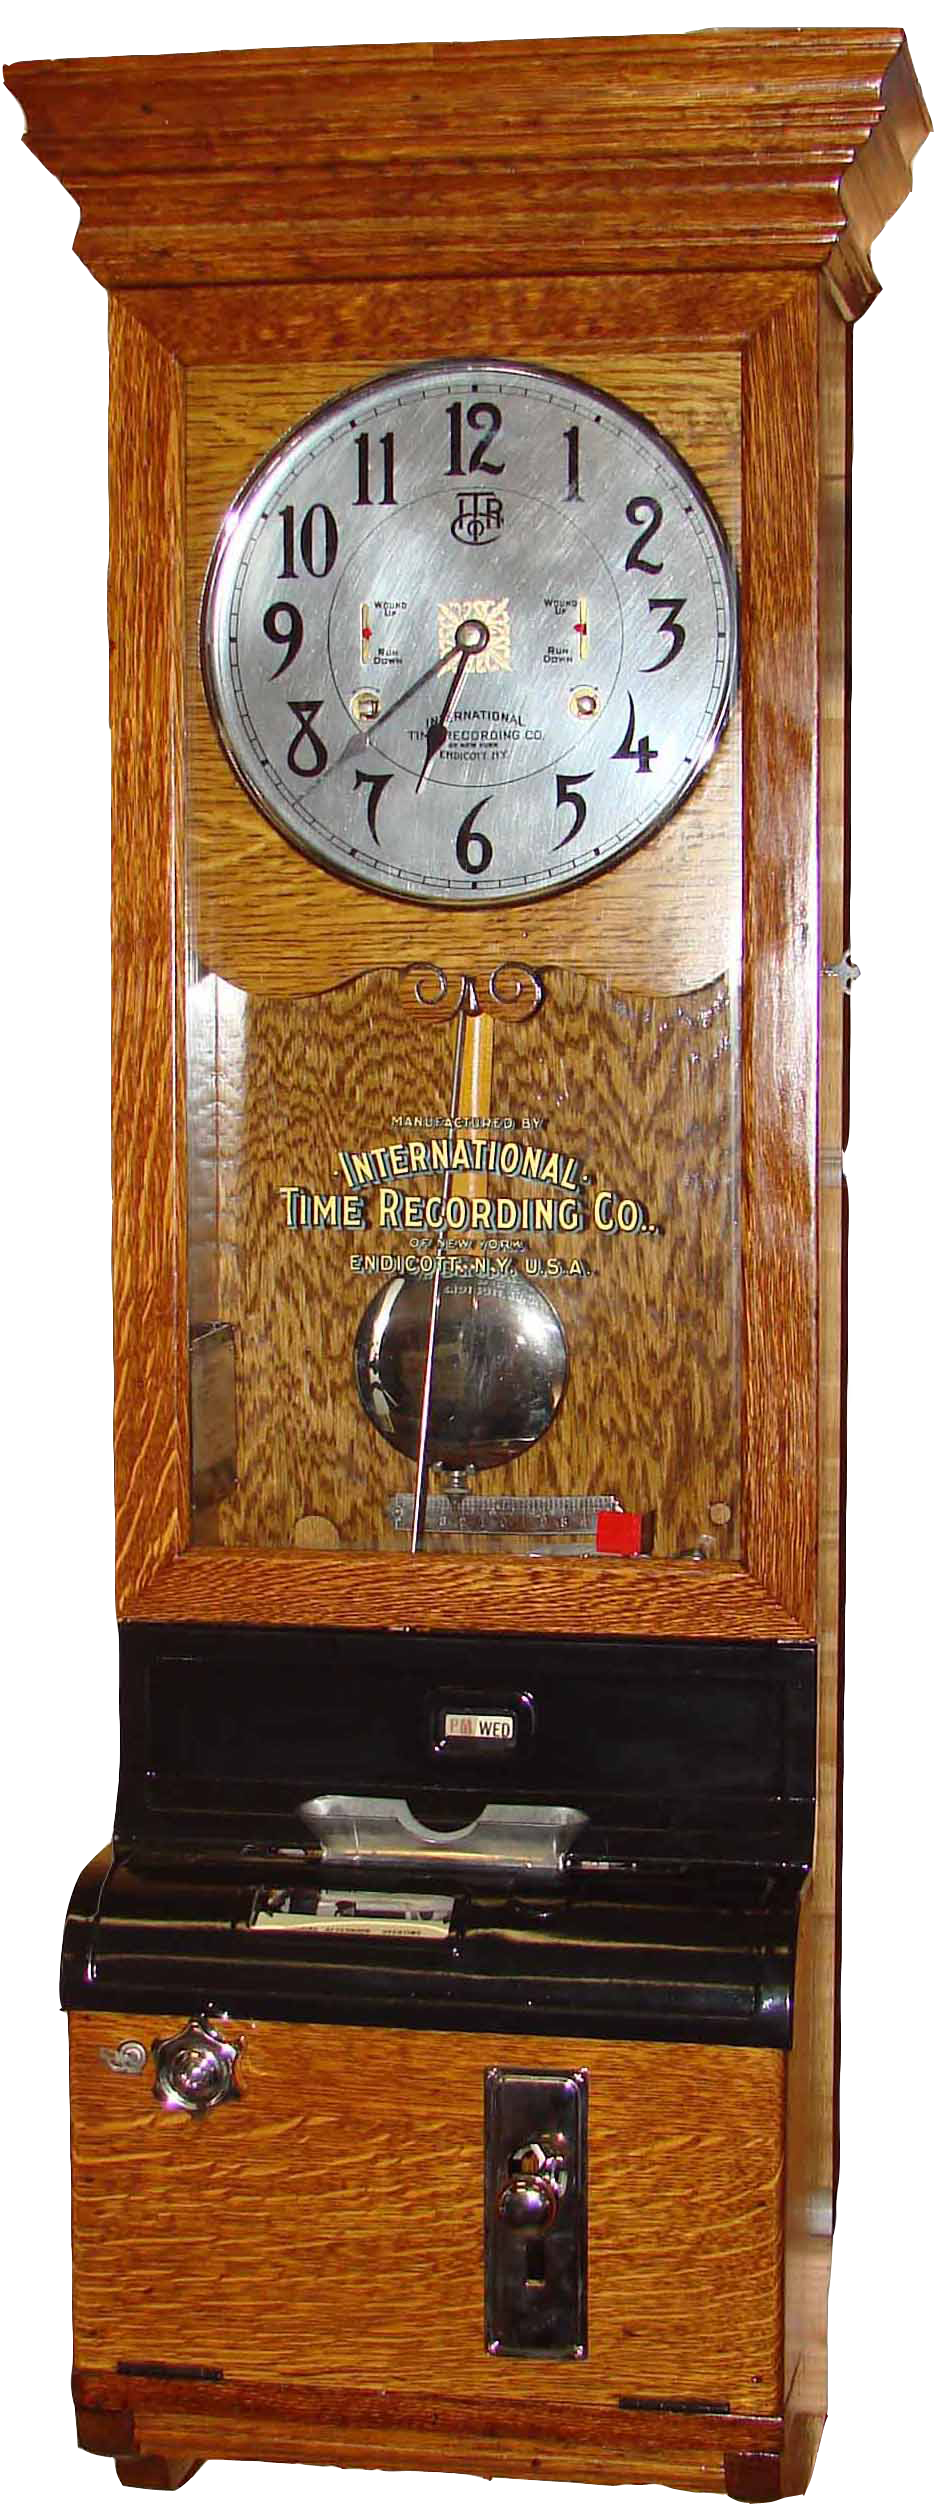
These little pointers mount onto a device that's called a "Geneva Mechanism." Some ITR clocks had two of these mechanical assemblies mounted on the front brass plate of the clock movement. ITR designed a unique Geneva Mech that changed the rotary motion of the "Winding Arbors" into a "stepped linear" or straight-line motion that drove the pointers. If your ITR clock has two vertical slots in the dial face (like the clock shown here), then these pointers should also be present. There will be two of them, one for each of the large mainsprings. These springs work in tandem and both contribute to run the entire clock and card punch mechanism.
When the mainsprings on the clock are fully "Wound-Up," the Geneva Mechs move the "Wind Indicators" (the pointer arrows) all the way to the top of the verical slots. As the springs "Run-Down," the pointers move downwards and eventually end up at the bottom of these slots. When the pointers indicate that the clock is run down, it's time to wind it back up again. ITR recommended that these clocks be wound twice each week. They suggested this to keep a more uniform spring force on the clockworks and card punch mechanism throughout the entire week. However, I have found that these vertical slots are long enough (and the springs strong enough) to last a complete 7 days. Every ITR clock that I've restored has run reliably for years by winding it only once per week. I wind my clocks on the same day and time every week. The Geneva Mechanisms, the vertical slots in the dial face, and the main springs are all designed to run a full week between windings.
My Wind Indicators are lazer cut metal which are then formed to match the original pointers. They "press fit" onto the pegs of the Geneva Mechanisms, which you can see just behind the dial face by looking through the vertical slots. Check your clock! If you don't see these pegs, your Geneva Mechs may have been removed! It was common to remove them, to make repairs easier for the clocksmith. My Wind Indicators remove easily by pulling them straight-off with your fingers or needle-nose plyers, when you need to remove the dial face to service the clock. I ship these parts unpainted (bare metal), so you can select your choice of finish. Some people like to paint them red or black, or you can simply color the outer surface with a black "Sharpie" permanent marker. You probably want to buy a set of 2pcs so they match, but I do sell them individually if you only need 1pc.
| Wind Indicator | ||
|---|---|---|
| Qty | Each | Total |
| 1 piece | $36.95 each | $36.95 |
| 1 set of 2pcs | $48.95 per set | $48.95 |
| 2 sets (4pcs) | $41.95 per set | $83.90 |
| 5 sets (10pcs) | $36.95 per set | $184.75 |
Ink Ribbon for Card Punch Mechanism
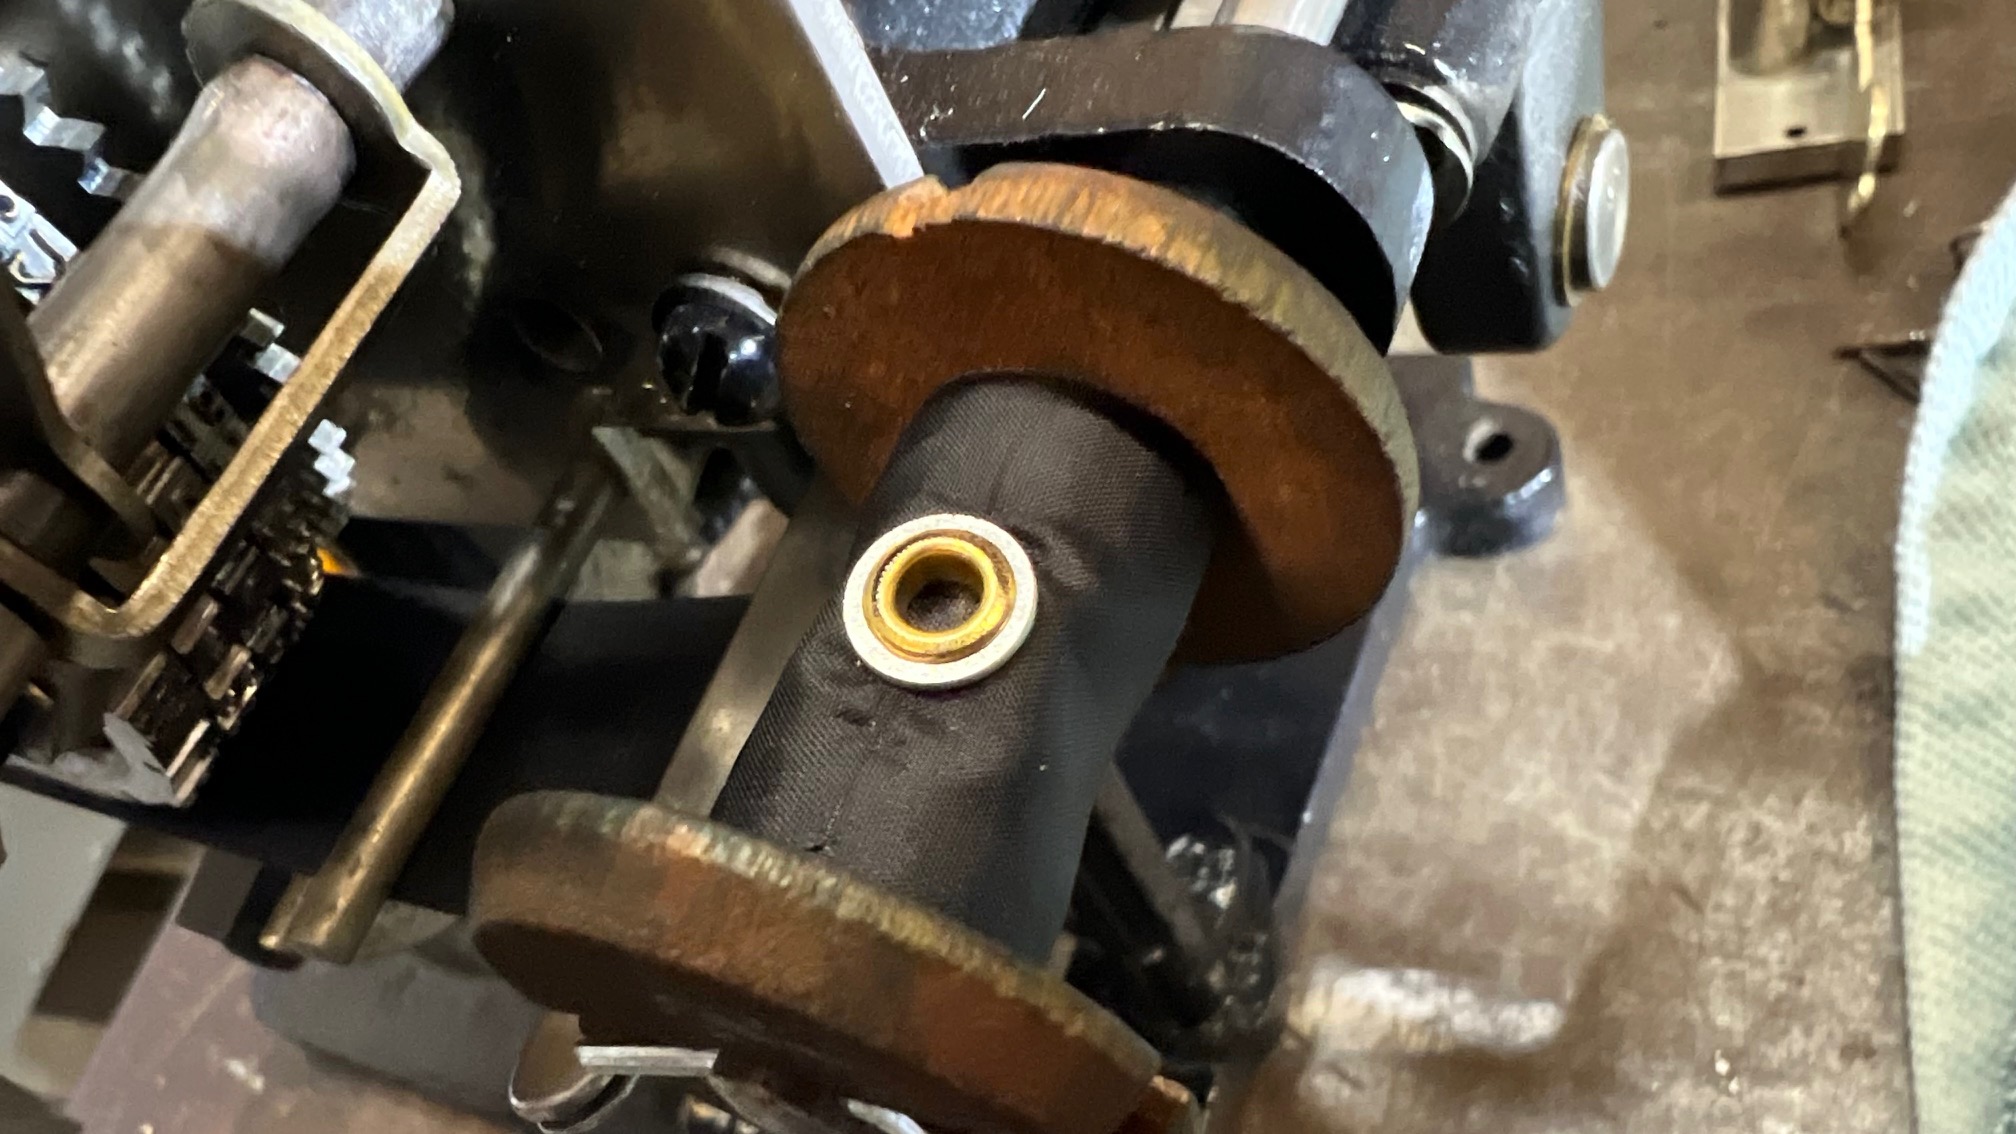
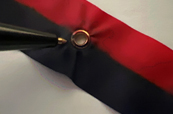
This is 1" wide ribbon that is saturated with ink. I have two syles of ribbon; solid black ink over the entire ribbon, or a dual color ribbon with red on one half and black on the other half. The two color ribbon is used on clocks that have the "Tardy" or "Late" function built into the card punch. Clocking into work on-time punches your timecard with black ink. Being late to work punches your card with red ink. The owner could set the specific time at which the ribbon changes from black to red, and then back from red to black again.
When a timecard is stamped, the ribbon moves slightly in one direction, in order to keep the ink fresh and wet for the next timecard stamp. The two pictures here show that the ribbon has a brass eyelet pressed into it. Each ribbon has two of these eyelets installed. The eyelets are located approximately 8" in from each end of the ribbon. The purpose of these eyelets are to activate a pair of "Reversing Levers" and gears on the card punch mech, that causes the ribbon spools to reverse direction as the end of the ribbon is reached on both ends. In this way, the ribbon never runs out because it reverses direction automatically and moves in the opposite direction.
I Sell This Ribbon in Three Ways:
1) If you're handy and can install the eyelets yourself (or if you have your own eyelets), I can sell you just the ribbon all by itself and you do the rest.
2) If you're not as handy, I can install the eyelets for you. The price goes up to cover the cost of my labor. You still need to attach the ribbon onto your ribbon spools.
3) If you're Really not handy or you just don't want to get ink all over your fingers, send me your ribbon spools and I'll do everything including removing the old ribbon, installing the eyelets, and mounting the ribbon onto your spools.
For all options, add $18 for Priority Mail shipping with tracking and insurance.
When you order, tell me which color ink you want, and which of the 3 options you want.
| Ink Ribbon (solid Black or Black/Red) | |
|---|---|
| Option | Each |
| Ribbon only, no Eyelets | $32.95 each |
| 1 set of Eyelets (2pcs) | $15.95 per set |
| Ribbon w/Eyelets installed | $78.95 |
| Ribbon w/Eyelets, mounted on your Spools | $108.95 |
Please contact me if you have any questions about these parts,
or visit my main webpage at http://www.GameRoomRepair.com for more information.
Thanks for your visit.
Kevin R. Keinert
4351 Beverly Dr.
Santa Maria, California
93455 USA
(805) 937-8881
